How to Open glTF Files
To open a .gltf file, select the JSON scene description together with every BIN and texture file it references. You can preview it in your browser or import the complete asset into a 3D application.
Updated November 14, 2026 · A practical guide1. Keep the model folder together
A .gltf file is readable JSON. It describes the scene and often points to geometry in a .bin file and images in a textures folder. Extract a downloaded ZIP first. Preserve the original folder structure, file names, and letter casing. Opening only the JSON file will not supply missing geometry or images.
2. Open the model and its resources
Open glTF Viewer and choose Open 3D File. Select one .gltf file and its BIN and image files together. If your asset has subfolders, Open folder preserves relative paths in browsers that support directory selection. A directory can also be dragged into the workspace in compatible browsers. Select a folder containing only one root model.
3. Explore the loaded scene
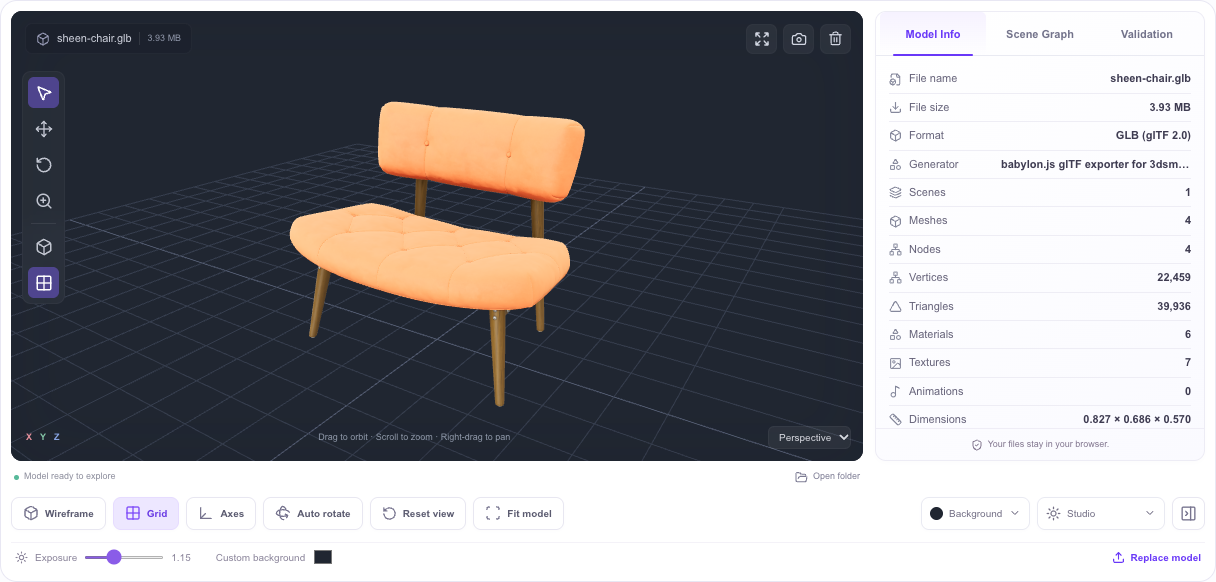
Drag with the left mouse button or one finger to rotate. Scroll or pinch to zoom. Right-drag or use the Pan control to move the view. Fit model frames the asset; Reset view restores its initial camera. Use the camera menu for front, back, left, right, top, and bottom views.
4. Inspect and validate
Model Info shows parsed geometry, material, texture, and animation counts. Scene Graph shows the node hierarchy. Models with animation clips have a playback bar. Run Validation to inspect structural errors and warnings, or download the JSON report. The validator can check a file even when rendering fails.
Why does a resource say “missing”?
The path stored in your model must resolve to a selected file. For example, textures/fabric.png requires that image, not a similarly named JPG. Choose the whole folder if multiple textures have identical file names. Remote resource URLs are blocked here; download the resources from a source you trust and use a local export.
When should I use Blender instead?
Use a 3D editor when you need to change geometry, reassign textures, fix UVs, or convert the asset. In Blender, use File → Import → glTF 2.0, select the .gltf file, and keep referenced resources available. This browser tool provides viewing and validation, not editing or conversion.
Choose files carefully when names repeat
Some projects contain several folders with files called albedo.png or material.bin. Selecting one image with a matching basename may not be enough; the URI in the JSON document includes a relative path. Preserve directories and exact capitalization, particularly when an asset was prepared on a case-sensitive system. If the file picker flattens a selection, use folder selection where available or select every file from the same preserved folder. Avoid renaming dependencies until the model opens, because changing a name without updating the glTF reference breaks the link.
What to try when loading still fails
Start with the complete source folder and confirm that the selected .gltf file is the root scene rather than a nested material or animation file. Read the displayed error for the specific missing URI or unsupported required extension. Run the validator even if the 3D preview cannot start; it may identify malformed JSON, invalid buffer lengths, or accessor problems. If all resources are present, open the same export in the authoring application and export a fresh glTF 2.0 asset. Keep the original files so you can compare the new package. The viewer does not fetch remote URLs or repair an asset automatically.
Compare browser and desktop results
If the same complete folder opens differently in two applications, check the importer version and supported extensions before changing the asset. Then compare texture paths, material settings, and lighting. This helps separate a packaging problem from a renderer difference. Keep the source folder unchanged while testing so both applications read the same files.
Read a resource path in the glTF document
If you can open the .gltf file in a text editor, find the buffers and images entries and look at each uri value. A relative value such as textures/wood.png points to a file beneath the scene document’s folder; it is not just a label. Check every path for the correct subfolder, extension, and capitalization. If the URI uses a data URI instead, that resource is embedded and does not need another selection. Do not edit the URI just to make the browser load: update it only when you intend to change the package, and keep a copy of the original export.
Ready to take a look?
Open your model. Explore every detail.